Articles
- Page Path
- HOME > J Powder Mater > Volume 31(5); 2024 > Article
-
Research Article
- A Parametric Study on the L-PBF Process of an AlSi10Mg Alloy for High-Speed Productivity of Automotive Prototype Parts
- Yeonha Chang1,†, Hyomoon Joo1,†, Wanghyun Yong1, Yeongcheol Jo1, Seongjin Kim1, Hanjae Kim1, Yeon Woo Kim2, Kyung Tae Kim2, Jeong Min Park2,*
-
Journal of Powder Materials 2024;31(5):390-398.
DOI: https://doi.org/10.4150/jpm.2024.00325
Published online: October 31, 2024
1Lightweight Materials Research Team, Hyundai Motor Group, Uiwang, 16082, Republic of Korea
2Department for 3D Printing Materials, Korea Institute of Materials Science (KIMS), Changwon 51508, Republic of Korea
- *Corresponding author. Tel.: +82 55 280 3502; E-mail address: jmpark@kims.re.kr (J.M. Park)
- †Yeonha Chang and Hyomoon Joo contributed equally to this work.
© The Korean Powder Metallurgy & Materials Institute
This is an Open Access article distributed under the terms of the Creative Commons Attribution Non-Commercial License (http://creativecommons.org/licenses/by-nc/4.0/) which permits unrestricted non-commercial use, distribution, and reproduction in any medium, provided the original work is properly cited.
- 2,435 Views
- 73 Download
- 4 Crossref
Abstract
- The AlSi10Mg alloy has garnered significant attention for its application in laser powder bed fusion (L-PBF), due to its lightweight properties and good printability using L-PBF. However, the low production speed of the L-PBF process is the main bottleneck in the industrial commercialization of L-PBF AlSi10Mg alloy parts. Furthermore, while L-PBF AlSi10Mg alloy exhibits excellent mechanical properties, the properties are often over-specified compared to the target properties of parts traditionally fabricated by casting. To accelerate production speed in L-PBF, this study investigated the effects of process parameters on the build rate and mechanical properties of the AlSi10Mg alloy. Guidelines are proposed for high-speed additive manufacturing of the AlSi10Mg alloy for use in automotive parts. The results show a significant increase in the build rate, exceeding the conventional build rate by a factor of 3.6 times or more, while the L-PBF AlSi10Mg alloy met the specifications for automotive prototype parts. This strategy can be expected to offer significant cost advantages while maintaining acceptable mechanical properties of topology-optimized parts used in the automobile industry.
- Additive manufacturing (AM), also known as 3D printing, is currently leading global manufacturing trends due to its irreplaceable advantages, including a high degree of design freedom for producing complex-shaped parts. By utilizing AM techniques, 3D parts designed by computer-aided design (CAD) modeling can be printed directly in layer-by-layer fashion [1, 2]. For manufacturing metallic engineering parts used in aerospace or automobile industries, various types of alloys have been utilized in metal AM method, including Al-based alloys [1-3], Ti-based alloys [4-6], Ni-based super-alloys [7, 8], Fe-based alloys [9-11], etc. Leveraging the unique characteristics of metal AM techniques, complex-shaped metallic products with desired performance (i.e., lightweight properties, good load-bearing capacity, etc.) can be designed and manufactured, which is often unattainable with traditional manufacturing techniques such as casting or forging. For example, in the automobile industry, the BMW i8 Roadster utilizes an optimized roof top bracket made of the AlSi10Mg alloy [12], and the Bugatti Chiron utilizes an optimized brake bracket made of the Ti-6Al-4V alloy [13]. Additionally, GE Additive has applied metal AM technology into aircraft engines. Through this, parts integration was achieved, 855 parts were reduced to 12 parts, and fuel consumption was reduced by more than 20 % [14].
- Among the various AM technologies, laser powder bed fusion (L-PBF), directed energy deposition (DED), and binder jetting (BJ) are notable metal AM methods. While Binder Jetting offers rapid production, it faces challenges related to non-uniform shrinkage and size limitations during post-processing, such as binder removal. For the DED process, in spite of its cost-effective advantages stemming from its ability to utilize wider range of particle size of the powder than those used in L-PBF and BJ, it often accompanies inconsistent surface quality of the processed parts. On the other hand, L-PBF method has gained widespread adoption in metal component manufacturing due to its excellent capability to produce high-quality outputs. However, it is still limited due to slow production speed, high costs, and restricted types of alloys used in the process. Therefore, recent research has been focused on addressing these inherent challenges and limitations of the L-PBF method.
- In the automotive industry, where high-quality components are paramount, L-PBF method has emerged as a prominent technique for producing metallic parts. Among the various alloy types used in the L-PBF, aluminum alloys have been attracting great attention in the automobile industry based on its lightweight characteristics [15, 16]. In particular, the AlSi10Mg alloy has been the most widely utilized alloy for the production of automotive parts using L-PBF, due to good LPBF printability of the alloy attributed to its high Si content [17, 18]. Furthermore, it is reported that the L-PBFed AlSi10Mg alloy having sound microstructure and high relative density (>99.5%) often exhibits good combination of strength and tensile ductility [1-3, 16-18]. However, due to the low manufacturing speed of L-PBF process, the production of high-volume automotive products utilizing L-PBF process with AlSi10Mg faces limitations in terms of productivity.
- On the other hand, the mechanical properties of fully dense AlSi10Mg produced by L-PBF are often over-specified compared to the target properties of automotive parts traditionally fabricated by casting, from the viewpoint of automotive manufacturers such as Hyundai Motor Group. In other words, although the relative density of the L-PBFed AlSi10Mg alloy may be lower, if it can meet the required properties of the target products while increasing production speed, automotive manufacturers can effectively reduce production costs and lead times, facilitating the commercialization of parts produced by L-PBF. Based on this concept, we performed a comprehensive study to investigate the influence of various build parameters on the defect evolution and mechanical properties of AlSi10Mg when increasing L-PBF production speed. The key process variables adjusted in this study are the scan speed, layer thickness, and hatch distance, all of which significantly have effect on the L-PBF production speed as well as the quality of products [19-21]. By systematically adjusting process parameters, we sought to optimize build conditions for achieving a harmonious balance between rapid production and desired mechanical performance, ultimately enabling the substitution of traditional casting methods for producing automotive parts.
- Our findings unequivocally demonstrate that by strategically optimizing build parameters, we can substantially enhance production speed without compromising the mechanical properties necessary for automotive applications. To validate these results, we fabricated a T/M SUPT BRKT component using our optimized parameters. Rigorous durability and fatigue testing subsequently confirmed its suitability for integration into automotive systems. This research offers a promising avenue for reducing costs and enhancing the competitiveness of AM method within the automotive industry. By optimizing build parameters, we can unlock the full potential of AlSi10Mg alloy in AM method, enabling the production of high-speed, cost-effective automotive components.
1. Introduction
- 2.1. Sample fabrication
- The commercial AlSi10Mg alloy powder (EOS GmbH, Germany) was used for L-PBF in the present study. The particle size range of the powder is characterized by a median particle size (D50) of 40 μm. To explore optimal build conditions for high-speed manufacturing of AlSi10Mg alloy using L-PBF, cuboidal specimens (10 mm × 10 mm × 10 mm) were fabricated in different process parameters by using commercial L-PBF machine (M290, EOS GmbH, Germany).
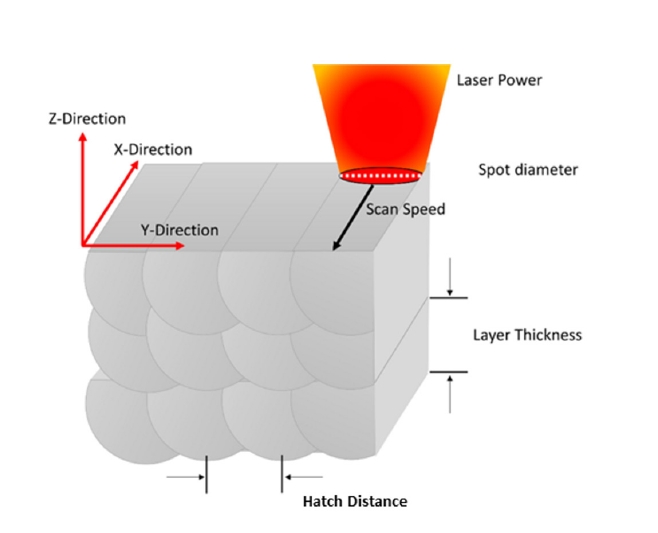
- In L-PBF process parameters interact in complex ways as schematically described in Fig. 1, making the identification of optimal combinations crucial for achieving desired part quality and build rates. Laser power was set at the highest level of 370 W, ensuring productivity while maintaining within safety margins. Laser scan speed was varied from 1,200 to 4,000 mm/s in 50 mm/s increments, resulting in a total of 57 different scan speeds. To investigate the effects of hatch distance and layer thickness, a total of four groups of specimens were produced with hatch distance of 0.1 mm and 0.12 mm, and layer thicknesses of 60 μm and 80 μm, using different scan speeds, leading to a total of 228 unique build conditions. The specimens were manufactured by rotating the scanning direction by 67° after each laser-melting sequence.
- 2.2. Defect analysis and mechanical testing
- In order to characterize the density and microstructure of the samples, each cubic sample was divided into four parts. The density of samples in each condition was measured by Archimedes method (ML204T, Mettler Toledo, USA) for the three parts divided from the cubic sample. For the remaining sample among the four parts, the surface of sample was finely polished, and optical micrograph (OM) analysis was performed on the sample surface by using OM (ECLIPSE MA200, Nikon Co., Japan).
- The mechanical properties of the tensile specimens were then evaluated to identify the optimal process parameters for high-quality and efficient L-PBF process. In order to manufacture tensile specimens, rectangular blocks (100 mm × 12 mm × 5 mm) were manufactured, and the samples were machined to dog-bone shaped specimens following ASTM E8M sub-size [22]. The tensile direction of the samples was parallel to the building direction (Z direction). Uniaxial tensile tests were performed using a universal testing system (INSTRON 4204, INSTRON Co., USA) at a strain rate of 10−3 s−1 at room temperature. An extensometer (Epsilon Co., USA) was used to measure accurate elongation, and to ensure repeatability, at least four specimens were tested in each case. The internal pore was analyzed using micro-computed tomography (Micro-CT, GE phoenix Vtomex M300).
2. Experimental Procedure
- 3.1. Sample fabrication and characterization
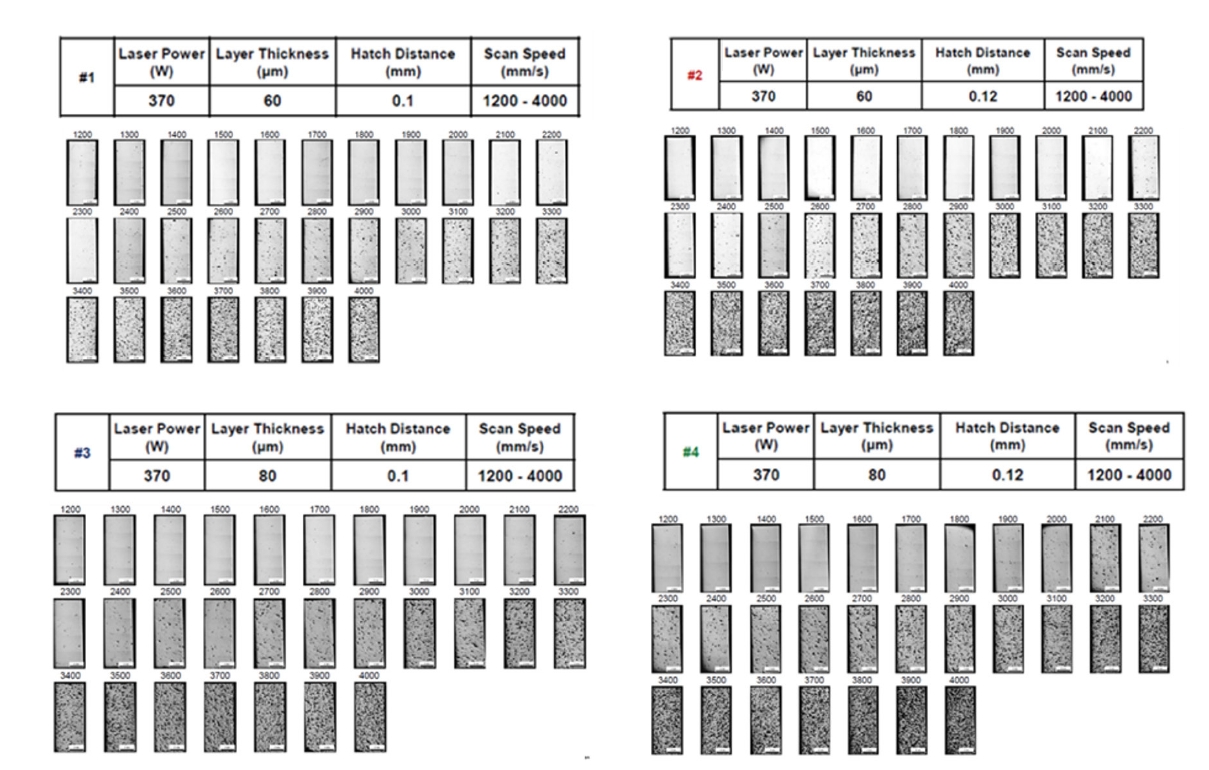
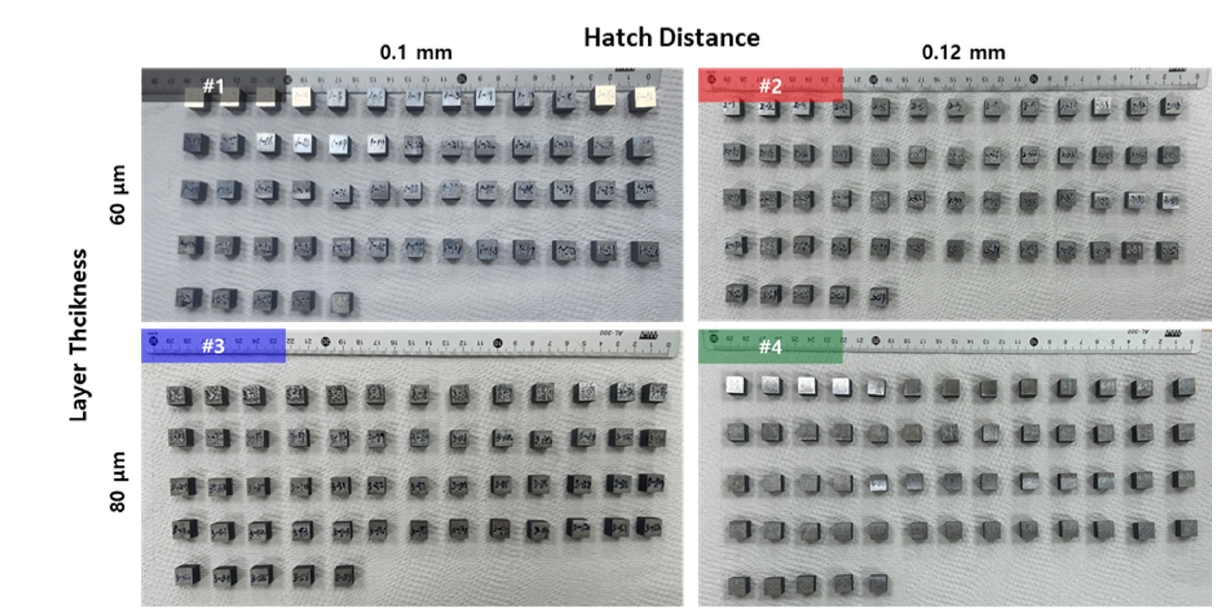
- The process parameter conditions for the cubic specimen mentioned above are summarized in Table 1. Groups were divided based on layer thickness and hatch distance (#1 ~ #4). A total of 228 were manufactured under the manufacturing conditions. As a result, it was confirmed that all ranges of samples were successfully manufactured in terms of appearance, as shown in Fig. 2.
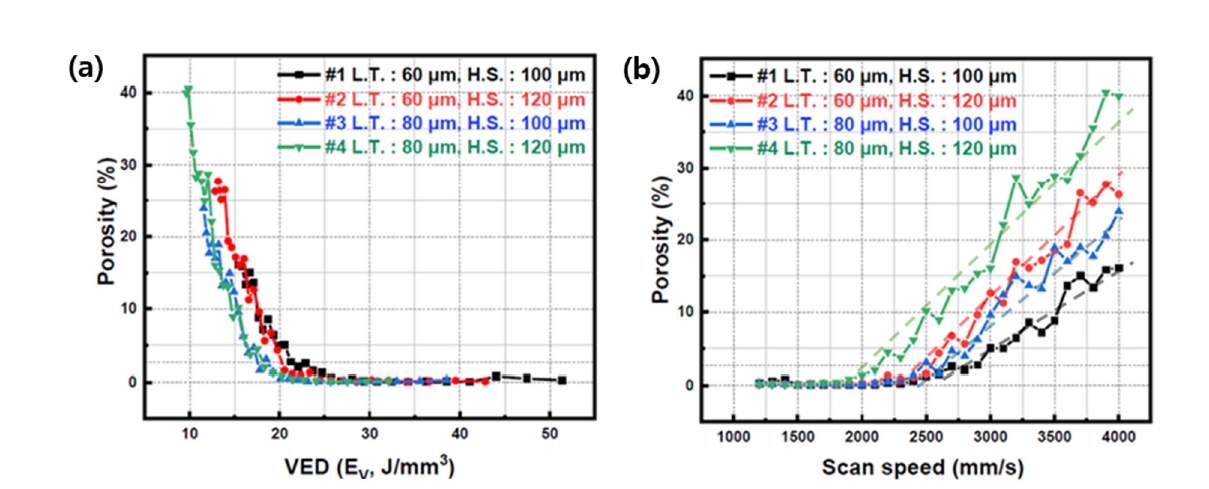
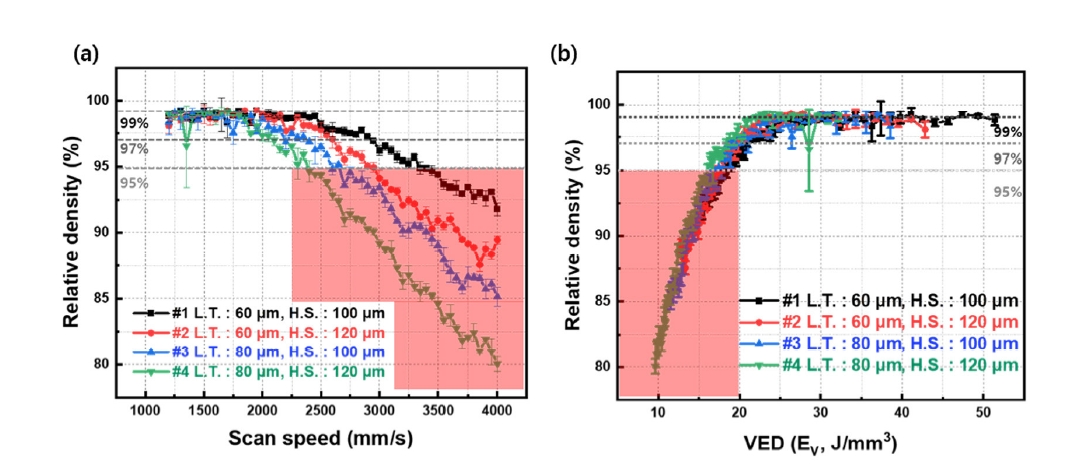
- Fig. 3(a) shows the variation of relative density of the LPBF-ed samples as a function of layer thickness and hatch distance in different scan speed conditions. As the scan speed increased, a gradual decrease in relative density was confirmed, and it was confirmed that the decrease in relative density due to the increase in scan speed increased further as the heat input decreased from #1, which is the condition with the highest heat input, to #2, #3, and #4 conditions.
- The volumetric energy density (VED) has been commonly used to estimate the heat input to the processed materials by considering major process parameters as below [1, 2]:
- where Ev is the VED, P is the laser powder, v is the scan speed, h is the hatch distance, and l is the layer thickness. For the present study, it was confirmed that the relative density increased in proportion to the VED as shown in Fig. 3(b). Specifically, the relative density was confirmed to be 99% or higher under conditions of VED 30 J/mm3 or higher, 97% or higher under conditions of VED 20 J/mm3 or higher, and 95 % or lower under conditions of VED 0 ~ 18 J/mm3. In past studies, results with a relative density of 95 % or higher were often judged to be optimal conditions. However, this means high-quality conditions without considering productivity [16-18].
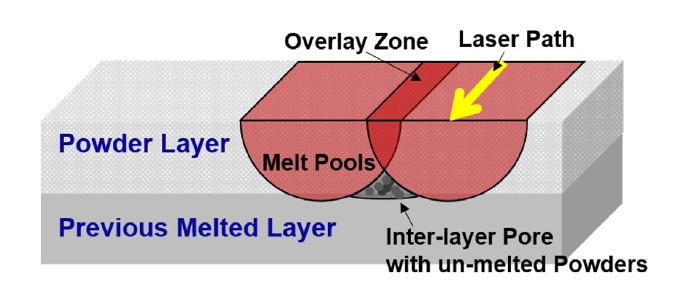
- After that, we performed microstructural analysis on the cubic samples as shown in Fig. 4(a). As summarized in the introduction, it was shown that gas pores occur frequently when VED is high (over 75 J/mm3) and lack-of-fusion pores occur frequently when VED is low (under 60 J/mm3) [15]. Specifically, in the case of #1, spherical gas pores were observed due to high heat input at a Scan Speed of 1,200 to 1,300 mm/s and lack-of-fusion pores were confirmed to occur at Scan Speeds of 2,200 mm/s or higher. In the case of #2, spherical gas pores were observed due to high heat input at scan speeds of 1,200 to 1,300 mm/s (similar to #1) and lack-of-fusion pores were confirmed to occur at scan speeds of 2,200 mm/s or higher. After 2,200 mm/s, the increase in porosity in #2 was larger than in #1. For #3, spherical gas pores were observed due to high heat input at scan speeds of 1,200 to 1,300 mm/s and lack-of-fusion porosity was confirmed at scan speeds of 2,200 mm/s or higher. After 2,200 mm/s, the porosity increased significantly compared to #1 and #2. For #4, spherical gas pores were observed due to high heat input at scan speeds of 1,200 to 1,300 mm/s and lack-of-fusion porosity was confirmed at scan speeds of 1,700 mm/s or higher. In summary, the porosity increased as the layer thickness and hatch distance increased, and the hatch distance was expected to have a greater effect. The scan speed criteria according to the porosity were: 3% at ~2,900 mm/s, 5% at ~3,000 mm/s, 7% at ~3,200 mm/s, and 10% at ~3,550 mm/s. Naturally, as the scan speed increases, the heat input decreases, resulting in an increase in porosity. After 3% at ~2,900 mm/s, a rapid decrease in porosity occurs, which is believed to be due to a rapid increase in the creation of lack-of-fusion pores. A schematic of the formation of lack-of-fusion pores depending on the heat input can be seen in Fig. 5 [23].
- For detailed analysis, we performed a porosity analysis of the microstructure using Image J software. Naturally, as shown in Fig. 6(a), we were able to confirm that VED and porosity are inversely proportional, and scan speed and porosity are inversely proportional. We confirmed that the increase in porosity according to the scan speed was larger from #1 → #4, and that the porosity was relatively lower under the same VED conditions from #1 → #4. This confirmed that hatch distance has a more effective on porosity than layer thickness, and we were able to derive the result of minimizing the increase in hatch distance when producing automotive prototype parts under high-speed production conditions. As shown in Fig. 6(b), scan speed and porosity have proportional tendencies, which are opposite to the results of VED and porosity.
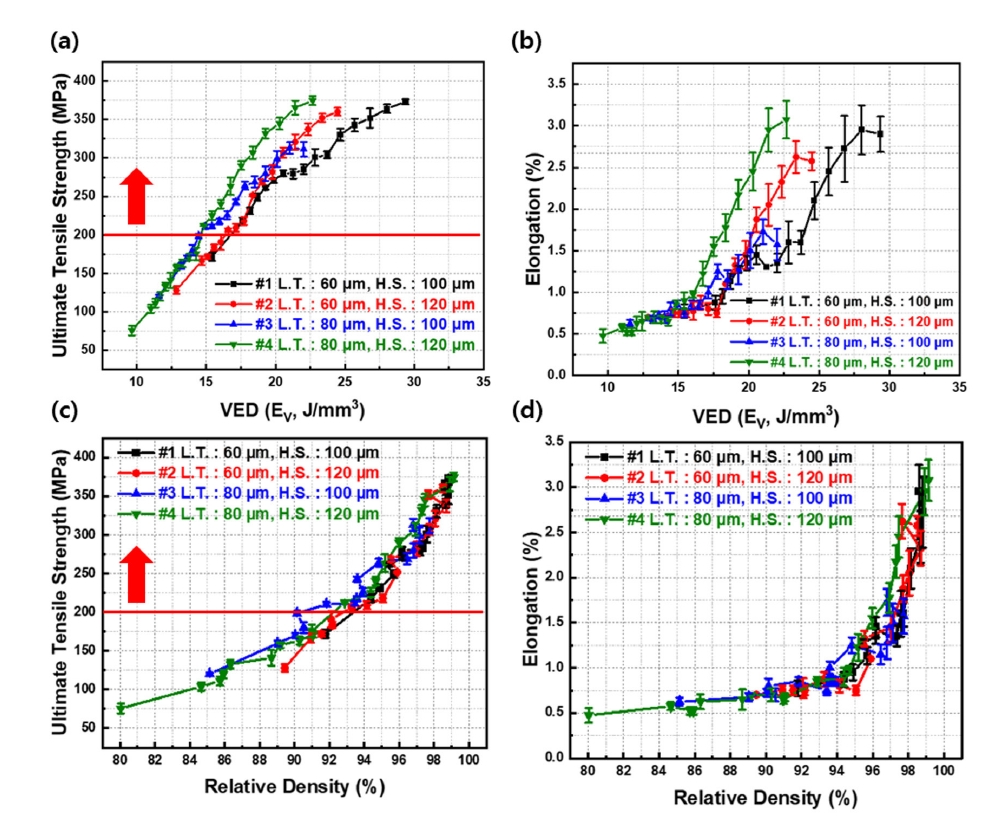
- After that, the secondary process parameter condition range was set for tensile samples, and the mechanical properties and microstructure analysis was performed. As a result, it was confirmed that the tensile properties generally decreased in the order of #1 → #2 → #3 → #4 at the same scan speed. The tensile strength was 81~375 MPa overall, the yield strength was 76~242 MPa, and the elongation was distributed in the range of 0.5~3.1%. Referring to the aluminum ADC12 alloy with die casting process, the high-speed manufacturing conditions were set at the tensile strength level of 200 MPa, the process parameter conditions of layer thickness 80 um, hatch distance 120 um, and scan speed 2,200 mm/s could be selected. This showed a tensile strength of 290 MPa, an elongation of 1.8%, and a speed 3.6 times faster than the optimal process parameter condition for the AlSi10Mg commercial alloy.
- Based on the data derived above as shown in Fig. 7, we conducted a correlation analysis. Specifically, we conducted a detailed analysis on the change in mechanical properties according to VED and the change in mechanical properties according to Archimedean relative density. First, as a result of analyzing the change in mechanical properties according to heat input, it was confirmed that both tensile strength and elongation decreased as the heat input decreased as shown in Fig. 7 (a) and (b), and this was predicted to be due to number or size of pores. It was confirmed that the tensile strength and elongation were generally high in the order of #4 → #3 → #2 → 1 under the same VED conditions. However, the difference is so small that it is not considered to be significant. It was also confirmed that the difference in properties at the same VED value was not large when the heat input was low. In addition, it was confirmed that the slope of the VED vs. ultimate tensile strength plot was higher for #3-#4 than for #1-#2 under low heat input conditions. After that, we conducted an analysis on the change in mechanical properties according to Archimedean relative density as shown in Fig. 7 (c) and (d). It was confirmed that both tensile strength and elongation decreased as the relative density decreased, and this was also predicted to be due to number or size of pores. It was confirmed that there was no significant difference in the strength and elongation decrease trend due to the decrease in relative density among each process condition (#1-#4). To interpret this, in the case of the lack-of-fusion defect-containing samples, the change in porosity defect according to the heat input was predicted to have the most dominant effect on the mechanical properties compared to other microstructural factors (e.g. grain size, cell structure, etc). In conclusion, at low VED of ~30 J/mm3 or less and low relative densities of 90–95 %, the differences in mechanical properties were interpreted as insignificant because there were sufficient pores. Based on these results, it was derived that a relative density of 93 % or more is required to achieve the tensile strength of 200 MPa based on the reference for aluminum die casting. In addition, the detailed analysis results of the mechanical properties confirmed that the decrease in the property values due to the increase in porosity was steeper in the tensile strength than in the yield strength. This is judged to be a characteristic of the high-speed manufacturing condition with many lack-of-fusion pores. In predicting the fracture behavior, the yield strength decreases due to the prediction of early yield due to the surrounding stress concentration, and then the tensile strength and elongation decrease as the fracture occurs along the lack-of-fusion pores. At this time, the fracture of the LPBFed AlSi10Mg alloy mainly propagates along the melt-pool boundary, and the tensile strength and elongation are predicted to decrease rapidly compared to the yield strength due to lack-of-fusion porosity and rapid propagation in the melt-pool boundary path [15].
- 3.2. Prototypes for Automotive Applications
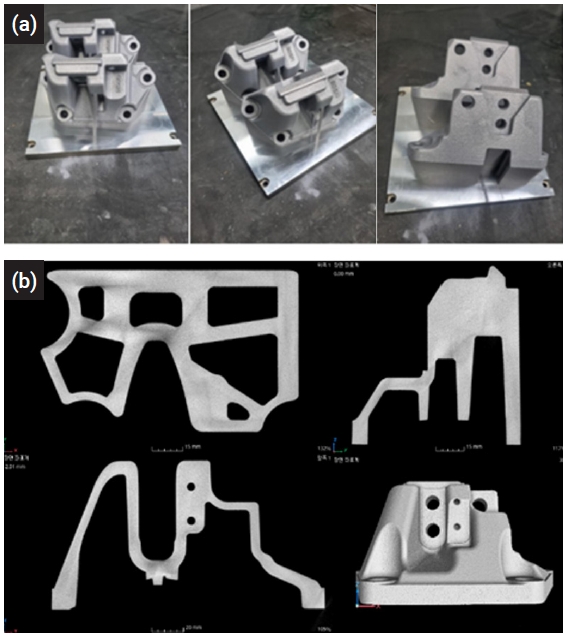
- Based on the results of previous studies, T/M SUPT BRKT was manufactured by L-PBF method under the selected process parameter conditions of laser power 360 W, layer thickness 80 um, hatch distance 120 um, and scan speed 2,200 mm/s, and the strength and fatigue durability evaluations were conducted as shown in Fig. 8. The plate size of the EOS M290 machine is 250 mm × 250 mm × 325 mm, and two parts can be manufactured on one plate. Under this high-speed process parameter condition, the mechanical properties were similar to those of the previous mass production method, Die-Casting. After that the support removal, CT analysis, and durability evaluation were performed. Micro-CT analysis showed that the fabricated samples had negligible internal porosity. The Micro-CT equipment used in this study had a resolution of 0.06 mm2, which allowed for the detection of even very small pores. T/M SUPT BRKT was manufactured by L-PBF passed the strength and fatigue durability evaluations, showing a superior strength level compared to mass production die-casting. Based on these results, the possibility of applying the prototype of a part with the high-speed process parameter condition of AlSi10Mg commercial alloy was confirmed.
3. Results and Discussion
- To establish optimal high-speed process parameter conditions for the L-PBFed AlSi10Mg alloy, a comprehensive study was conducted with involving specimen fabrication, process parameter analysis, and mechanical property evaluation. By correlating manufacturing conditions with mechanical characteristics and considering mass production material specifications, we successfully identified suitable parameters for product manufacturing and durability assessment. The key findings of this research are summarized below.
- (1) To optimize high-speed process parameter conditions for AlSi10Mg alloy, a comprehensive study was conducted. Initially, 57 build conditions were defined, varying scan speed from 1,200 to 4,000 mm/s in 50 mm/s increments. Layer thickness and hatch distance were set at 60 µm/80 µm and 0.1 mm/0.12 mm, respectively, resulting in 228 cubic specimens. These specimens were evaluated for formability, Archimedes relative density, and porosity microstructure. Based on these results, secondary build conditions were selected for tensile specimen fabrication and subsequent mechanical property and microstructure evaluation. Lamination was confirmed across all specimens, with gas porosity frequently observed at high VED and lack-of-fusion porosity at low VED. The impact of scan speed on porosity was found to be more significant than layer thickness. For prototypes automotive parts, The L-PBF manufacturing conditions were determined by referring to the guide for replacing die-cast parts. In detail, laser power 360 W, layer thickness 80 µm, hatch distance 120 µm, and scan speed 2,200 mm/s were determined to meet this requirement, representing 3.6 times increase in build rate compared to conventional high-quality conditions. This suggests that these conditions can enhance both productivity and cost-competitiveness.
- (2) The influence of heat input on mechanical properties was analyzed. Results indicated that both tensile strength and elongation decreased with decreasing heat input, likely due to porosity. At low heat input, variations in properties at the same VED were minimal. Similarly, correlation analysis between Archimedes relative density and mechanical properties revealed a decrease in both tensile strength and elongation with decreasing relative density, attributed to porosity. The impact of porosity on mechanical properties was found to be more pronounced than that of microstructural features like precipitation phase and cell structure.
- (3) To validate the selected manufacturing conditions, T/M SUPT BRKT parts were fabricated using laser power 370 W, layer thickness 80 µm, hatch distance 120 µm, and scan speed 2,200 mm/s. Static strength and fatigue durability were evaluated. CT analysis confirmed first-grade quality, and both static strength and fatigue durability met the required standards. The static strength and elongation exhibited excellent levels compared to mass-produced die-castings.
4. Conclusion
-
Conflict of Interest
The authors declare no competing financial interests or personal relationships.
-
Author Information and Contribution
Y. C. : Writing – original draft, Visualization, Methodology, Investigation, Formal analysis, Data curation, Conceptualization. H. J. : Writing – original draft, Visualization, Methodology, Investigation, Formal analysis, Data curation, Conceptualization. W. Y. : Data curation, Formal analysis. Y. J. : Methodology, Visualization. S. K. : Methodology, Investigation. H. K. : Supervision, Resources, Investigation, Data curation, Conceptualization. Y. W. K. : Visualization, Methodology, Investigation, Formal analysis, Data curation. K. T. K. : Writing – review & editing, Visualization, Supervision, Resources, Project administration, Methodology. J. M. P. : Writing – review & editing, Supervision, Resources, Conceptualization.
-
Acknowledgement
This work was supported by the Hyundai Motor Group.
Article information


| Group No. | Laser power [W] | Layer thickness [㎛] | Hatch distance [mm] | Scan speed [mm/s] |
|---|---|---|---|---|
| #1 | 370 | 60 | 0.1 | 1,200~4,000 |
| #2 | 370 | 60 | 0.12 | 1,200~4,000 |
| #3 | 370 | 80 | 0.1 | 1,200~4,000 |
| #4 | 370 | 80 | 0.12 | 1,200~4,000 |
- 1. A. du Plessis, S. M. J. Razavi, M. Benedetti, S. Murchio, M. Leary, M. Watson, D. Bhate and F. Berto: Prog. Mater. Sci., 125 (2022) 100918.Article
- 2. T. Maconachie, M. Leary, B. Lozanovski, X. Zhang, M. Qian, O. Faruque and M. Brandt: Mater. Des., 183 (2019) 108137.Article
- 3. H. M. Joo, W. C. Kim, Y. I. Jung, H. J. Kim, S. J. Kim, Y. C. Jo, W. H. Yong and D. H. Kim: Met. Mater. Int., 30 (2024) 1294.ArticlePDF
- 4. V. Juechter, M. M. Franke, T. Merenda, A. Stich, C. Körner and R. F. Singer: Addit. Manuf., 22 (2018) 118.Article
- 5. G. Roy, R. N. Hajra, W. H. Kim, J. Lee, S. Kim and J. H. Kim: J. Powder Mater., 31 (2024) 1.ArticlePDF
- 6. H. Park, Y. W. Kim, S. Lee, K. T. Kim, J.-H. Yu, J. G. Kim and J. M. Park: J. Powder Mater., 30 (2023) 140.Article
- 7. X. Wang, L. N. Carter, B. Pang, M. M. Attallah and M. H. Loretto: Acta Mater., 128 (2017) 87.Article
- 8. J. Suh, S. Lim, H.-H. Jin, Y.-B. Chun, S. H. Kan and H. N. Han: J. Powder Mater., 30 (2023) 431.Article
- 9. E. Liverani, S. Toschi, L. Ceschini and A. Fortunato: J. Mater. Process. Tech., 249 (2017) 255.Article
- 10. H. M. Joo, W. C. Kim, Y. J. Kim, Y. C. Jo, M. G. Kang, J. Y. Lee, M. S. Kim, G. B. Kim, S. J. Kim and D.H. Kim: Met. Mater. Int., 29 (2023) 983.ArticlePDF
- 11. S. O. Lim and S.-E. Shin: J. Powder Mater., 31 (2024) 308.Article
- 12. K. Riener, N. Albrecht, S. Ziegelmeier, R. Ramakrishnan, L. Haferkamp, A. B. Spierings and G. J. Leichtfried: Addit. Manuf., 34 (2020) 101286.Article
- 13. F. Gotzke and H. Hoppe: ATZ Worldwide, 123 (2021) 36.
- 14. N. Wegrzyn: Safety & Defense, 8 (2022) 2.
- 15. N. T. Aboulkhair, M. Simonelli, L. Parry, I. Ashcroft, C. Tuck and R. Hague: Prog. Mater. Sci., 106 (2019) 100578.Article
- 16. T. DebRoy, H. L. Wei, J. S. Zuback, T. Mukherjee, J. W. Elmer, J. O. Milewski, A. M. Beese, A. Wilson-Heid, A. De and W. Zhang: Prog. Mater. Sci., 92 (2018) 112.Article
- 17. J. Kwon, Y. T. Choi, E. S. Kim, S. Y. Ahn, S. G. Jeong, M. Kang, H. Joo, J. M. Park and H. S. Kim: Mater. Sci. Eng. A, 901 (2024) 146537.Article
- 18. Y. S. Eom, J. M. Park, J. W. Choi, D. J. Seong, H. Joo, Y. C. Jo, K. T. Kim, J. H. Yu and I. Son: J. Alloys Compd., 956 (2023) 170348.Article
- 19. R. E. Gite and V. D. Wakchaure: Mater. Today: Proc., 72 (2023) 966.Article
- 20. J. Praneeth, S. Venkatesh and L. S. Krishna: Mater. Today: Proc., (2023.
- 21. A. K. Singla, M. Banerjee, A. Sharma, J. Singh, A. Bansal, M. K. Gupta, N. Khanna, A. S. Shahi and D. K. Goyal: J. Manuf. Process., 64 (2021) 161.Article
- 22. ASTM F2792-12a, Standard Terminology for Additive Manufacturing Technologies.
- 23. J. M. Park, J. M. Jeon, J. G. Kim, Y. Seong, S. H. Park and H. S. Kim: J. Powder Mater., 25 (2018) 475.Article
References
Figure & Data
References
Citations

- Data-Driven analysis relates mechanical properties to pore morphology in laser powder bed fusion
Jaemin Wang, Seungyeon Lee, Yeon Woo Kim, Kyung Tae Kim, Jeong Min Park, Dierk Raabe
Acta Materialia.2026; 304: 121751. CrossRef - Role of Si-decorated cell structure in cryogenic tensile behavior of additively manufactured AlSi10Mg alloy
Haeum Park, Jisung Yoo, Hyojin Hwang, Minsoo Jin, Yonghee Jo, Tae Jin Jang, Ji-Hun Yu, Seok Su Sohn, Jeong Min Park
Materials Science and Engineering: A.2026; 959: 150080. CrossRef - Lightweight Design of a Connecting Rod Using Lattice-Structure Parameter Optimisation: A Test Case for L-PBF
Michele Amicarelli, Michele Trovato, Paolo Cicconi
Machines.2025; 13(3): 171. CrossRef - Effect of Support Structure on Residual Stress Distribution in Ti-6Al-4V Alloy Fabricated by Laser Powder Bed Fusion
Seungyeon Lee, Haeum Park, Min Jae Baek, Dong Jun Lee, Jae Wung Bae, Ji-Hun Yu, Jeong Min Park
Journal of Powder Materials.2025; 32(3): 244. CrossRef


Fig. 1.
Fig. 2.
Fig. 3.
Fig. 4.
Fig. 5.
Fig. 6.
Fig. 7.
Fig. 8.
| Group No. | Laser power [W] | Layer thickness [㎛] | Hatch distance [mm] | Scan speed [mm/s] |
|---|---|---|---|---|
| #1 | 370 | 60 | 0.1 | 1,200~4,000 |
| #2 | 370 | 60 | 0.12 | 1,200~4,000 |
| #3 | 370 | 80 | 0.1 | 1,200~4,000 |
| #4 | 370 | 80 | 0.12 | 1,200~4,000 |
Table 1.
TOP
 KPMI
KPMI


 ePub Link
 Cite this Article