Search
- Page Path
- HOME > Search
- [Korean]
- Evaluation of Mechanical Properties of Pure Ni Coatings on a Type 316H Stainless Steel Substrate via High-Velocity Oxy-fuel and Directed Energy Deposition Processes
- Won Chan Lee, Seung Ju Nam, Ji-Hyun Yoon, Jeoung Han Kim
- J Powder Mater. 2025;32(4):309-314. Published online August 29, 2025
- DOI: https://doi.org/10.4150/jpm.2025.00185
- 859 View
- 9 Download
-
 Abstract
 PDF
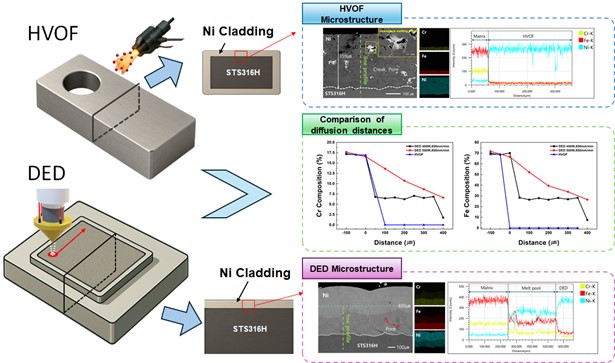
PDF - This study compares pure Ni coatings deposited on type 316H stainless steel using high-velocity oxy-fuel (HVOF) and directed energy deposition (DED) processes. Microstructural analysis showed that DED produced more uniform claddings with fewer pores, while HVOF resulted in incomplete melting and cracks. Elemental diffusion of Cr and Fe from the substrate into the cladding was evident in DED samples, especially at higher laser power, but minimal in HVOF due to low heat input. Vickers hardness testing revealed that DED claddings had higher hardness near the interface, which was attributed to solid solution strengthening and reduced porosity. Although HVOF better suppressed diffusion, it exhibited inferior mechanical properties due to internal defects. Overall, the DED process demonstrated superior coating quality and mechanical performance, suggesting its suitability for corrosion-resistant applications requiring both structural integrity and thermal stability, such as molten salt reactors.
- [English]
- Comparative Review of the Microstructural and Mechanical Properties of Ti-6Al-4V Fabricated via Wrought and Powder Metallurgy Processes
- Raj Narayan Hajra, Gargi Roy, An Seong Min, Hyunseok Lee, Jeoung Han Kim
- J Powder Mater. 2024;31(5):365-373. Published online October 31, 2024
- DOI: https://doi.org/10.4150/jpm.2024.00213
- 3,073 View
- 72 Download
- 2 Citations
-
 Abstract
 PDF
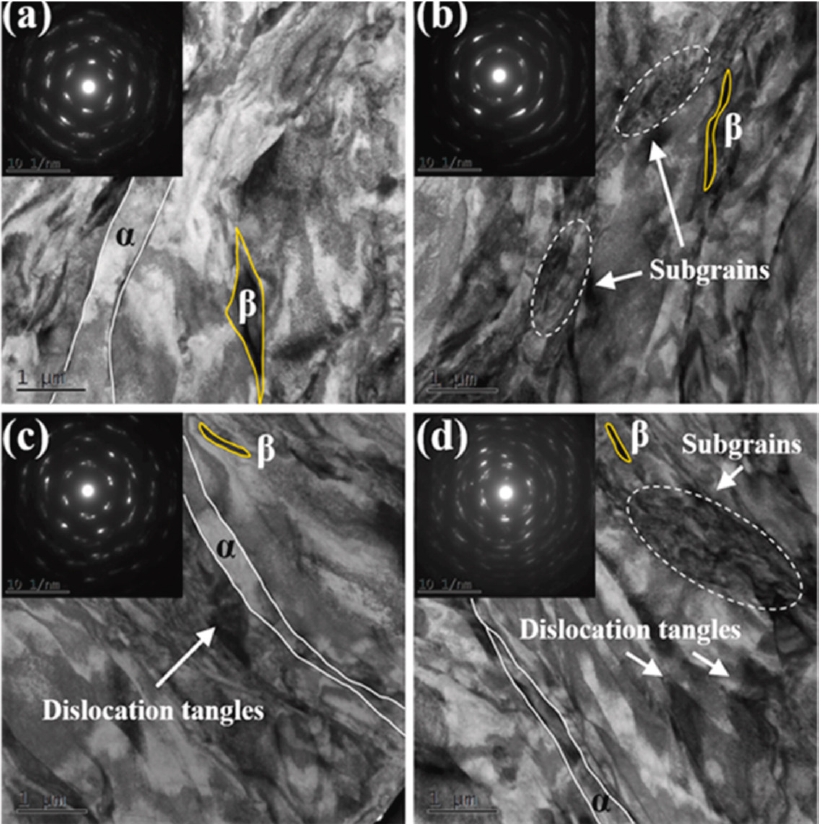
PDF - This review examines the microstructural and mechanical properties of a Ti-6Al-4V alloy produced by wrought processing and powder metallurgy (PM), specifically laser powder bed fusion (LPBF) and hot isostatic pressing. Wrought methods, such as forging and rolling, create equiaxed alpha (α) and beta (β) grain structures with balanced properties, which are ideal for fatigue resistance. In contrast, PM methods, particularly LPBF, often yield a martensitic α′ structure with high microhardness, enabling complex geometries but requiring post-processing to improve its properties and reduce stress. The study evaluated the effects of processing parameters on grain size, phase distribution, and material characteristics, guiding the choice of fabrication techniques for optimizing Ti-6Al-4V performance in aerospace, biomedical, and automotive applications. The analysis emphasizes tailored processing to meet advanced engineering demands.
-
Citations
Citations to this article as recorded by- Removal of Organic and Inorganic Contaminants from Titanium Turning Scrap via Alkali and Acid Two-Step Cleaning
Seong Min An, Raj Narayan Hajra, Chan Hee Park, Jin-Ho Yoon, Jinsung Rho, Chang-Min Yoon, Jeoung Han Kim
MATERIALS TRANSACTIONS.2025; 66(7): 855. CrossRef - Effect of oxygen content in feedstock powders on microstructure and mechanical properties of ELI Ti-6Al-4V fabricated via laser powder bed fusion
Woo Hyeok Kim, Sang Woo Kim, Raj Narayan Hajra, Gargi Roy, Jeoung Han Kim
Powder Metallurgy.2025; 68(4): 307. CrossRef
- Removal of Organic and Inorganic Contaminants from Titanium Turning Scrap via Alkali and Acid Two-Step Cleaning
- [Korean]
- Study on the Elemental Diffusion Distance of a Pure Nickel Layer Additively Manufactured on 316H Stainless Steel
- UiJun Ko, Won Chan Lee, Gi Seung Shin, Ji-Hyun Yoon, Jeoung Han Kim
- J Powder Mater. 2024;31(3):220-225. Published online June 27, 2024
- DOI: https://doi.org/10.4150/jpm.2024.00164
- 1,636 View
- 54 Download
- 4 Citations
-
 Abstract
 PDF
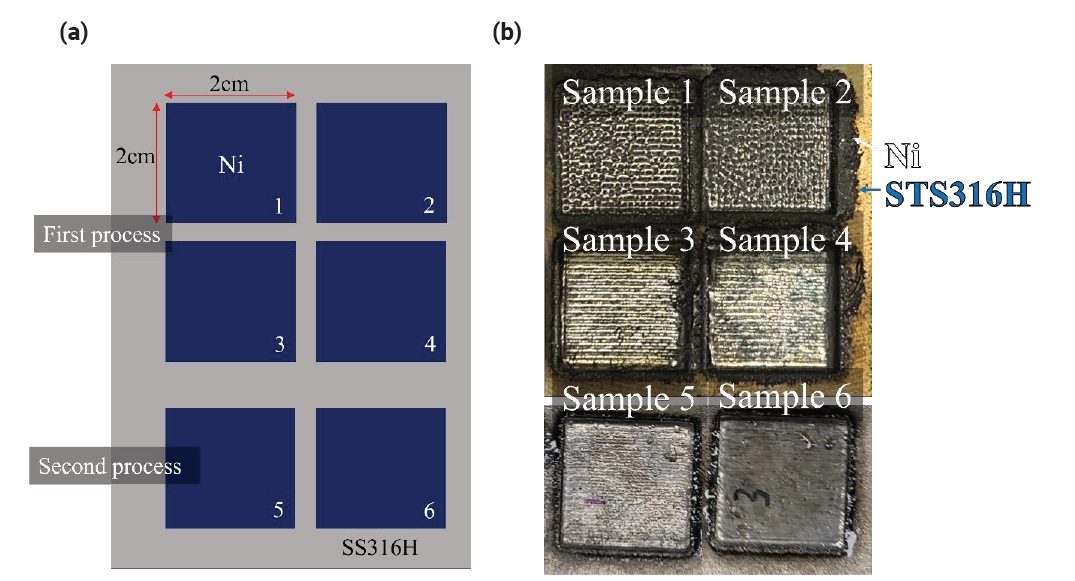
PDF - Molten salt reactors represent a promising advancement in nuclear technology due to their potential for enhanced safety, higher efficiency, and reduced nuclear waste. However, the development of structural materials that can survive under severe corrosion environments is crucial. In the present work, pure Ni was deposited on the surface of 316H stainless steel using a directed energy deposition (DED) process. This study aimed to fabricate pure Ni alloy layers on an STS316H alloy substrate. It was observed that low laser power during the deposition of pure Ni on the STS316H substrate could induce stacking defects such as surface irregularities and internal voids, which were confirmed through photographic and SEM analyses. Additionally, the diffusion of Fe and Cr elements from the STS316H substrate into the Ni layers was observed to decrease with increasing Ni deposition height. Analysis of the composition of Cr and Fe components within the Ni deposition structures allows for the prediction of properties such as the corrosion resistance of Ni.
-
Citations
Citations to this article as recorded by- Microstructural analysis and characterization of nickel deposition on 316H stainless steel via gas tungsten arc welding and powder laser cladding
Won Chan Lee, Jin Woong Park, Seung Ju Nam, Ji-Hyun Yoon, Jeoung Han Kim
Powder Metallurgy.2025; 68(4): 342. CrossRef - Effect of oxygen content in feedstock powders on microstructure and mechanical properties of ELI Ti-6Al-4V fabricated via laser powder bed fusion
Woo Hyeok Kim, Sang Woo Kim, Raj Narayan Hajra, Gargi Roy, Jeoung Han Kim
Powder Metallurgy.2025; 68(4): 307. CrossRef - Development of Aluminum Alloys for Additive Manufacturing Using Machine Learning
Sungbin An, Juyeon Han, Seoyeon Jeon, Dowon Kim, Jae Bok Seol, Hyunjoo Choi
Journal of Powder Materials.2025; 32(3): 202. CrossRef - Evaluation of Mechanical Properties of Pure Ni Coatings on a Type 316H Stainless Steel Substrate via High-Velocity Oxy-fuel and Directed Energy Deposition Processes
Won Chan Lee, Seung Ju Nam, Ji-Hyun Yoon, Jeoung Han Kim
Journal of Powder Materials.2025; 32(4): 309. CrossRef
- Microstructural analysis and characterization of nickel deposition on 316H stainless steel via gas tungsten arc welding and powder laser cladding
- [English]
- Microstructural Evolution and Mechanical Properties of Ti-6Al-4V Alloy through Selective Laser Melting: Comprehensive Study on the Effect of Hot Isostatic Pressing (HIP)
- Gargi Roy, Raj Narayan Hajra, Woo Hyeok Kim, Jongwon Lee, Sangwoo Kim, Jeoung Han Kim
- J Powder Mater. 2024;31(1):1-7. Published online February 28, 2024
- DOI: https://doi.org/10.4150/KPMI.2024.31.1.1
- 6,272 View
- 136 Download
- 9 Citations
-
 Abstract
 PDF
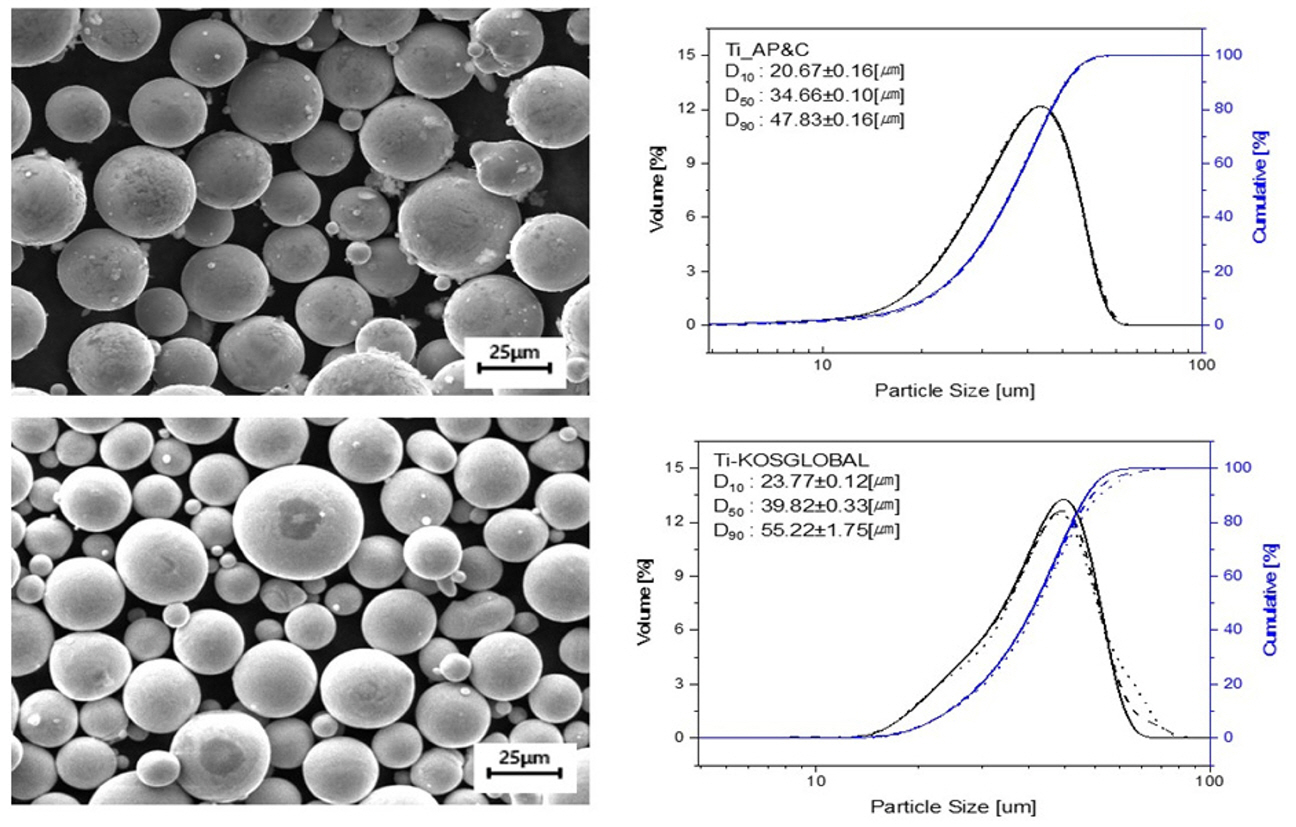
PDF This study explores the profound impact of varying oxygen content on microstructural and mechanical properties in specimens HO and LO. The higher oxygen concentration in specimen HO is found to significantly influence alpha lath sizes, resulting in a size of 0.5-1 μm, contrasting with the 1-1.5 μm size observed in specimen LO. Pore fraction, governed by oxygen concentration, is high in specimen HO, registering a value of 0.11%, whereas specimen LO exhibits a lower pore fraction (0.02%). Varied pore types in each specimen further underscore the role of oxygen concentration in shaping microstructural morphology. Despite these microstructural variations, the average hardness remains consistent at ~370 HV. This study emphasizes the pivotal role of oxygen content in influencing microstructural features, contributing to a comprehensive understanding of the intricate interplay between elemental composition and material properties.
-
Citations
Citations to this article as recorded by- Additive manufacturing of Ti-6Al-4V based oxide dispersion strengthened alloy using in-situ oxide-dispersed powders and bound metal deposition
Woo Hyeok Kim, Raj Narayan Hajra, Hyung-Ki Park, Jung-Yeul Yun, Jeoung Han Kim
Journal of Alloys and Compounds.2026; 1050: 185574. CrossRef - Mechanical response and microstructural evolution of a composite joint fabricated by green laser dissimilar welding of VCoNi medium entropy alloy and 17-4PH stainless steel
Hadiseh Esmaeilpoor, Mahdi Aghaahmadi, Hyun Jong Yoo, Chan Woong Park, Tae Jin Jang, Seok Su Sohn, Jeoung Han Kim
Journal of Materials Science & Technology.2025; 213: 223. CrossRef - High-integrity diffusion bonding of laser powder bed fused, forged, and rolled Ti–6Al–4V alloys
Seoyeon Jeon, Hyunjong Ha, Dong Jun Lee, Hyeonil Park, Yong Nam Kwon, Hyunjoo Choi, Hyokyung Sung
Journal of Materials Research and Technology.2025; 35: 2108. CrossRef - Removal of Organic and Inorganic Contaminants from Titanium Turning Scrap via Alkali and Acid Two-Step Cleaning
Seong Min An, Raj Narayan Hajra, Chan Hee Park, Jin-Ho Yoon, Jinsung Rho, Chang-Min Yoon, Jeoung Han Kim
MATERIALS TRANSACTIONS.2025; 66(7): 855. CrossRef - Effect of Support Structure on Residual Stress Distribution in Ti-6Al-4V Alloy Fabricated by Laser Powder Bed Fusion
Seungyeon Lee, Haeum Park, Min Jae Baek, Dong Jun Lee, Jae Wung Bae, Ji-Hun Yu, Jeong Min Park
Journal of Powder Materials.2025; 32(3): 244. CrossRef - Obtaining functionally-graded metal-matrix materials Ti‒6Al‒4V + WC in the process of 3D printing by the method of additive plasma-arc deposition
V. Korzhyk, A. Grynyuk, O. Babych, O. Berdnikova, Ye. Illiashenko, O. Bushma
The Paton Welding Journal.2025; 2025(8): 29. CrossRef - Obtaining functionally-graded metal-matrix materials ti‒6al‒4v + wc by the method of additive plasma-arc deposition
V.M. Korzhyk, A.A. Grynyuk, O.A. Babych, O.M. Berdnikova, Ye.V. Illiashenko, O.I. Bushma
Avtomatičeskaâ svarka (Kiev).2025; 2025(5): 48. CrossRef - Comparative Review of the Microstructural and Mechanical Properties of Ti-6Al-4V Fabricated via Wrought and Powder Metallurgy Processes
Raj Narayan Hajra, Gargi Roy, An Seong Min, Hyunseok Lee, Jeoung Han Kim
Journal of Powder Materials.2024; 31(5): 365. CrossRef - A Parametric Study on the L-PBF Process of an AlSi10Mg Alloy for High-Speed Productivity of Automotive Prototype Parts
Yeonha Chang, Hyomoon Joo, Wanghyun Yong, Yeongcheol Jo, Seongjin Kim, Hanjae Kim, Yeon Woo Kim, Kyung Tae Kim, Jeong Min Park
Journal of Powder Materials.2024; 31(5): 390. CrossRef
- Additive manufacturing of Ti-6Al-4V based oxide dispersion strengthened alloy using in-situ oxide-dispersed powders and bound metal deposition
- [Korean]
- Fixed-point Iteration for the Plastic Deformation Analysis of Anisotropic Materials
- Seung-Yong Yang, Jeoung Han Kim
- J Powder Mater. 2023;30(1):29-34. Published online February 1, 2023
- DOI: https://doi.org/10.4150/KPMI.2023.30.1.29
- 488 View
- 4 Download
-
 Abstract
 PDF
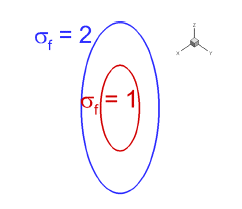
PDF A fixed-point iteration is proposed to integrate the stress and state variables in the incremental analysis of plastic deformation. The Conventional Newton–Raphson method requires a second-order derivative of the yield function to generate a complicated code, and the convergence cannot be guaranteed beforehand. The proposed fixed-point iteration does not require a second-order derivative of the yield function, and convergence is ensured for a given strain increment. The fixed-point iteration is easier to implement, and the computational time is shortened compared with the Newton–Raphson method. The plane-stress condition is considered for the biaxial loading conditions to confirm the convergence of the fixed-point iteration. 3-dimensional tensile specimen is considered to compare the computational times in the ABAQUS/explicit finite element analysis.
- [Korean]
- Effect of Laser Beam Diameter on the Microstructure and Hardness of 17-4 PH Stainless Steel Additively Manufactured by Direct Energy Deposition
- Woo Hyeok Kim, UiJun Go, Jeoung Han Kim
- J Powder Mater. 2022;29(4):314-319. Published online August 1, 2022
- DOI: https://doi.org/10.4150/KPMI.2022.29.4.314
- 1,128 View
- 9 Download
- 3 Citations
-
 Abstract
 PDF
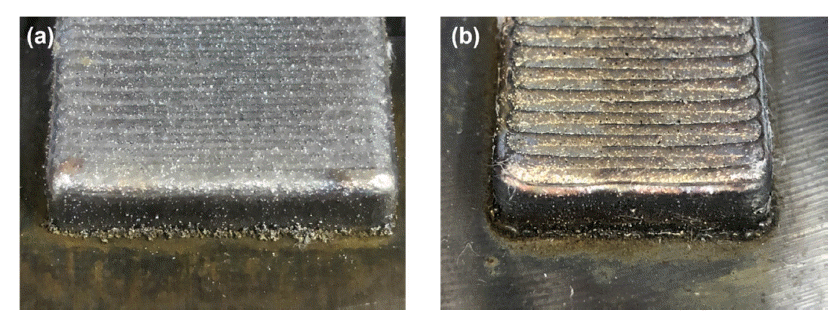
PDF The effect of the laser beam diameter on the microstructure and hardness of 17-4 PH stainless steel manufactured via the directed energy deposition process is investigated. The pore size and area fraction are much lower using a laser beam diameter of 1.0 mm compared with those observed using a laser beam diameter of 1.8 mm. Additionally, using a relatively larger beam diameter results in pores in the form of incomplete melting. Martensite and retained austenite are observed under both conditions. A smaller width of the weld track and overlapping area are observed in the sample fabricated with a 1.0 mm beam diameter. This difference appears to be mainly caused by the energy density based on the variation in the beam diameter. The sample prepared with a beam diameter of 1.0 mm had a higher hardness near the substrate than that prepared with a 1.8 mm beam diameter, which may be influenced by the degree of melt mixing between the 17-4 PH metal powder and carbon steel substrate.
-
Citations
Citations to this article as recorded by- Mechanical response and microstructural evolution of a composite joint fabricated by green laser dissimilar welding of VCoNi medium entropy alloy and 17-4PH stainless steel
Hadiseh Esmaeilpoor, Mahdi Aghaahmadi, Hyun Jong Yoo, Chan Woong Park, Tae Jin Jang, Seok Su Sohn, Jeoung Han Kim
Journal of Materials Science & Technology.2025; 213: 223. CrossRef - Laser additive manufacturing of ceramic reinforced titanium matrix composites: A review of microstructure, properties, auxiliary processes, and simulations
Yuzhou Zeng, Jiandong Wang, Xuanrui Liu, Yu Xue, Lang Tang, Yunxiang Tong, Fengchun Jiang
Composites Part A: Applied Science and Manufacturing.2024; 177: 107941. CrossRef - Study on the Elemental Diffusion Distance of a Pure Nickel Layer Additively Manufactured on 316H Stainless Steel
UiJun Ko, Won Chan Lee, Gi Seung Shin, Ji-Hyun Yoon, Jeoung Han Kim
journal of Korean Powder Metallurgy Institute.2024; 31(3): 220. CrossRef
- Mechanical response and microstructural evolution of a composite joint fabricated by green laser dissimilar welding of VCoNi medium entropy alloy and 17-4PH stainless steel
- [Korean]
- Joint Interface Observation of V and 17-4PH Stainless Steel Dissimilar Materials Manufactured by Direct Energy Deposition
- Se-Hwan Lee, Hobeom Kim, Jeoung Han Kim
- J Powder Mater. 2022;29(1):8-13. Published online February 1, 2022
- DOI: https://doi.org/10.4150/KPMI.2022.29.1.8

- 649 View
- 5 Download
-
 Abstract
 PDF
PDF In this study, we have prepared a Ti-6Al-4V/V/17-4 PH composite structure via a direct energy deposition process, and analyzed the interfaces using scanning electron microscopy (SEM) and transmission electron microscopy (TEM). The joint interfaces comprise two zones, one being a mixed zone in which V and 17-4PH are partially mixed and another being a fusion zone in the 17-4PH region which consists of Fe+FeV. It is observed that the power of the laser used in the deposition process affects the thickness of the mixed zone. When a 210 W laser is used, the thickness of the mixed zone is wider than that obtained using a 150 W laser, and the interface resembles a serrated shape. Moreover, irrespective of the laser power used, the expected σ phase is found to be absent in the V/17-4 PH stainless steel joint; however, many VN precipitates are observed.
- [Korean]
- Joint Properties of Inconel 718 Additive Manufactured on Ti-6Al-4V by FGM method
- Chan Woong Park, Jin Woong Park, Ki Chae Jung, Se-Hwan Lee, Sung-Hoon Kim, Jeoung Han Kim
- J Korean Powder Metall Inst. 2021;28(5):417-422. Published online October 1, 2021
- DOI: https://doi.org/10.4150/KPMI.2021.28.5.417
- 605 View
- 5 Download
-
 Abstract
 PDF
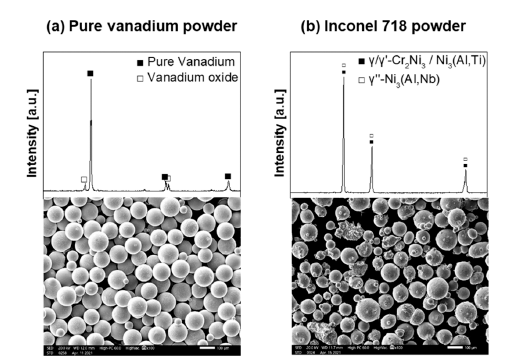
PDF In the present work, Inconel 718 alloy is additively manufactured on the Ti-6Al-4V alloy, and a functionally graded material is built between Inconel 718 and Ti-6Al-4V alloys. The vanadium interlayer is applied to prevent the formation of detrimental intermetallic compounds between Ti-6Al-4V and Inconel 718 by direct joining. The additive manufacturing of Inconel 718 alloy is performed by changing the laser power and scan speed. The microstructures of the joint interface are characterized by scanning electron microscopy, energy-dispersive X-ray spectroscopy, and micro X-ray diffraction. Additive manufacturing is successfully performed by changing the energy input. The micro Vickers hardness of the additive manufactured Inconel 718 dramatically increased owing to the presence of the Cr-oxide phase, which is formed by the difference in energy input.
- [Korean]
- Microstructure and High Temperature Mechanical Properties of Oxide Dispersion Strengthened Steels Manufactured by Combination Milling Process
- Jung-Uk Lee, Young-Kyun Kim, Jeoung Han Kim, Hwi-Jin Kim, Kee-Ahn Lee
- J Korean Powder Metall Inst. 2021;28(5):389-395. Published online October 1, 2021
- DOI: https://doi.org/10.4150/KPMI.2021.28.5.389
- 849 View
- 10 Download
-
 Abstract
 PDF
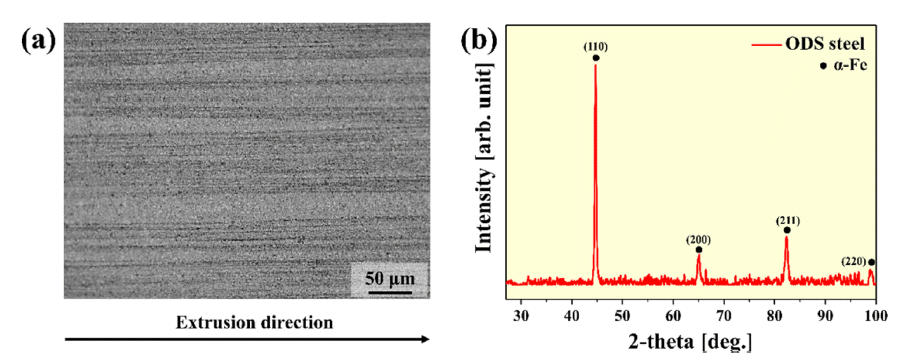
PDF Oxide dispersion-strengthened (ODS) steel has excellent high-temperature properties, corrosion resistance, and oxidation resistance, and is expected to be applicable in various fields. Recently, various studies on mechanical alloying (MA) have been conducted for the dispersion of oxide particles in ODS steel with a high number density. In this study, ODS steel is manufactured by introducing a complex milling process in which planetary ball milling, cryogenic ball milling, and drum ball milling are sequentially performed, and the microstructure and high-temperature mechanical properties of the ODS steel are investigated. The microstructure observation revealed that the structure is stretched in the extrusion direction, even after the heat treatment. In addition, transmission electron microscopy (TEM) analysis confirmed the presence of oxide particles in the range of 5 to 10 nm. As a result of the room-temperature and high-temperature compression tests, the yield strengths were measured as 1430, 1388, 418, and 163 MPa at 25, 500, 700, and 900°C, respectively. Based on these results, the correlation between the microstructure and mechanical properties of ODS steel manufactured using the composite milling process is also discussed.
- [Korean]
- Computation of Stress Field During Additive Manufacturing by Explicit Finite Element Method
- Seung-Yong Yang, Jeoung Han Kim
- J Korean Powder Metall Inst. 2020;27(4):318-324. Published online August 1, 2020
- DOI: https://doi.org/10.4150/KPMI.2020.27.4.318
- 934 View
- 3 Download
- 1 Citations
-
 Abstract
 PDF
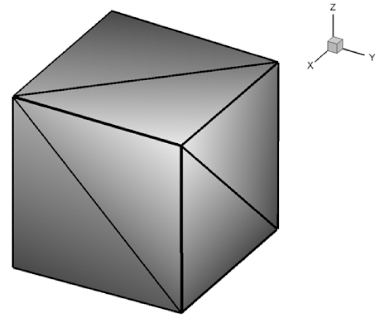
PDF In the present work, an explicit finite element analysis technique is introduced to analyze the thermal stress fields present in the additive manufacturing process. To this purpose, a finite element matrix formulation is derived from the equations of motion and continuity. The developed code, NET3D, is then applied to various sample problems including thermal stress development. The application of heat to an inclusion from an external source establishes an initial temperature from which heat flows to the surrounding body in the sample problems. The development of thermal stress due to the mismatch between the thermal strains is analyzed. As mass scaling can be used to shorten the computation time of explicit analysis, a mass scaling of 108 is employed here, which yields almost identical results to the quasi-static results.
-
Citations
Citations to this article as recorded by- Stress-Induced Deformation of Thin Copper Substrate in Double-Sided Lapping
Jiang Guo, Zengxu He, Bo Pan, Bin Wang, Qian Bai, Jinxing Kong, Renke Kang
Chinese Journal of Mechanical Engineering.2023;[Epub] CrossRef
- Stress-Induced Deformation of Thin Copper Substrate in Double-Sided Lapping
- [English]
- Modeling the Relationship between Process Parameters and Bulk Density of Barium Titanates
- Sang Eun Park, Hong In Kim, Jeoung Han Kim, N. S. Reddy
- J Korean Powder Metall Inst. 2019;26(5):369-374. Published online October 1, 2019
- DOI: https://doi.org/10.4150/KPMI.2019.26.5.369
- 1,004 View
- 6 Download
-
 Abstract
 PDF
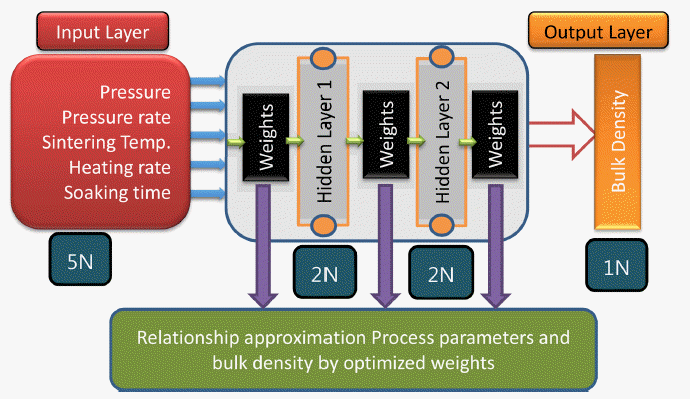
PDF The properties of powder metallurgy products are related to their densities. In the present work, we demonstrate a method to apply artificial neural networks (ANNs) trained on experimental data to predict the bulk density of barium titanates. The density is modeled as a function of pressure, press rate, heating rate, sintering temperature, and soaking time using the ANN method. The model predictions with the training and testing data result in a high coefficient of correlation (R2 = 0.95 and Pearson’s r = 0.97) and low average error. Moreover, a graphical user interface for the model is developed on the basis of the transformed weights of the optimally trained model. It facilitates the prediction of an infinite combination of process parameters with reasonable accuracy. Sensitivity analysis performed on the ANN model aids the identification of the impact of process parameters on the density of barium titanates.
- [Korean]
- Joint Properties of Stainless Steel and Titanium Alloys Additive Manufactured on Medium Entropy Alloys
- Chan Woong Park, Nana Kwabena Adomako, Min Gyu Lee, Jeoung Han Kim
- J Korean Powder Metall Inst. 2019;26(4):319-326. Published online August 1, 2019
- DOI: https://doi.org/10.4150/KPMI.2019.26.4.319
- 783 View
- 5 Download
-
 Abstract
 PDF
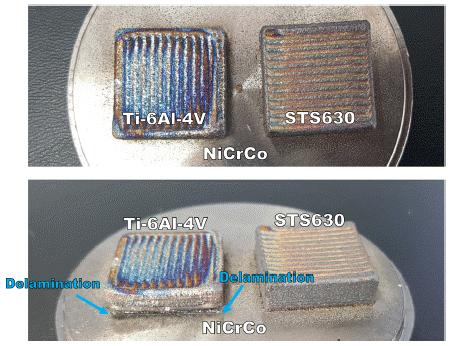
PDF Additive manufacturing (AM) is a highly innovative method for joining dissimilar materials for industrial applications. In the present work, AM of STS630 and Ti-6Al-4V powder alloys on medium entropy alloys (MEAs) NiCrCo and NiCrCoMn is studied. The STS630 and Ti64 powders are deposited on the MEAs. Joint delamination and cracks are observed after the deposition of Ti64 on the MEAs, whereas the deposition of STS630 on the MEAs is successful, without any cracks and joint delamination. The microstructure around the fusion zone interface is characterized by scanning electron microscopy and X-ray diffraction. Intermetallic compounds are formed at the interfacial regions of MEA-Ti64 samples. In addition, Vicker’s hardness value increased dramatically at the joint interface between MEAs and Ti-6Al-4V compared to that between MEAs and STS630. This result is attributed to the brittle nature of the joint, which can lead to a decrease in the joint strength.
- [Korean]
- Microstructure and Mechanical Properties of Oxide Dispersion Strengthened alloy Based on Commercially Pure Titanium
- Taesung Park, Jeoung Han Kim
- J Korean Powder Metall Inst. 2018;25(4):327-330. Published online August 1, 2018
- DOI: https://doi.org/10.4150/KPMI.2018.25.4.327

- 1,037 View
- 9 Download
- 4 Citations
-
 Abstract
 PDF
PDF This study is conducted as a preliminary research to verify the feasibility of Ti-based Oxide dispersion strengthened (ODS) alloy. Pure-Ti powder is mixed with Y2O3 powder and subsequently, mechanically alloyed at -150°C. The Ti-based ODS powder is hot-isostatically pressed and subsequently hot-rolled for recrystallization. The microstructure consists of elongated grains and Y excess fine particles. The oxide particle size is larger than that of the typical Febased ODS steel. Tensile test shows that the tensile ductility is approximately 25%, while the strength is significantly higher than that of pure Ti. The high-temperature hardness of the Ti-ODS alloy is also significantly higher than that of pure Ti at all temperatures, while being lower than that of Ti-6Al-4V. The dimple structure is well developed, and no evidence of cleavage fracture surface is observed in the fracture surface of the tensile specimen.
-
Citations
Citations to this article as recorded by- Additive manufacturing of Ti-6Al-4V based oxide dispersion strengthened alloy using in-situ oxide-dispersed powders and bound metal deposition
Woo Hyeok Kim, Raj Narayan Hajra, Hyung-Ki Park, Jung-Yeul Yun, Jeoung Han Kim
Journal of Alloys and Compounds.2026; 1050: 185574. CrossRef - Experimental and Numerical Evaluation of Rockwell Hardness at High Temperatures
NamSeok Lee
Journal of the Korean Society of Manufacturing Technology Engineers.2025; 34(3): 165. CrossRef - Spheroidization of Pure-vanadium Powder using Radio Frequency Thermal Plasma Process
Nana Kwabena Adomako, Seungmin Yang, Min Gyu Lee, N. S. Reddy, Jeoung-Han Kim
Journal of Korean Powder Metallurgy Institute.2019; 26(4): 305. CrossRef - Microstructure and Mechanical Properties of Friction-Welded Alloy 718 and SNCRW Stainless Steel After Post-Weld Heat-Treatment
Jeoung Han Kim, Nam-Yong Kim, Yu Sik Kong, Nho Kwang Park
Journal of Welding and Joining.2019; 37(4): 313. CrossRef
- Additive manufacturing of Ti-6Al-4V based oxide dispersion strengthened alloy using in-situ oxide-dispersed powders and bound metal deposition
- [Korean]
- Hardness and Microstructure evolution of SUS630 Stainless steel Fabricated by Directed Energy Deposition
- Seong Eun Back, Kyung-Ho Noh, Jin Yong Park, Yong Ju Cho, Jeoung Han Kim
- J Korean Powder Metall Inst. 2018;25(3):220-225. Published online June 1, 2018
- DOI: https://doi.org/10.4150/KPMI.2018.25.3.220
- 1,424 View
- 16 Download
- 5 Citations
-
 Abstract
 PDF
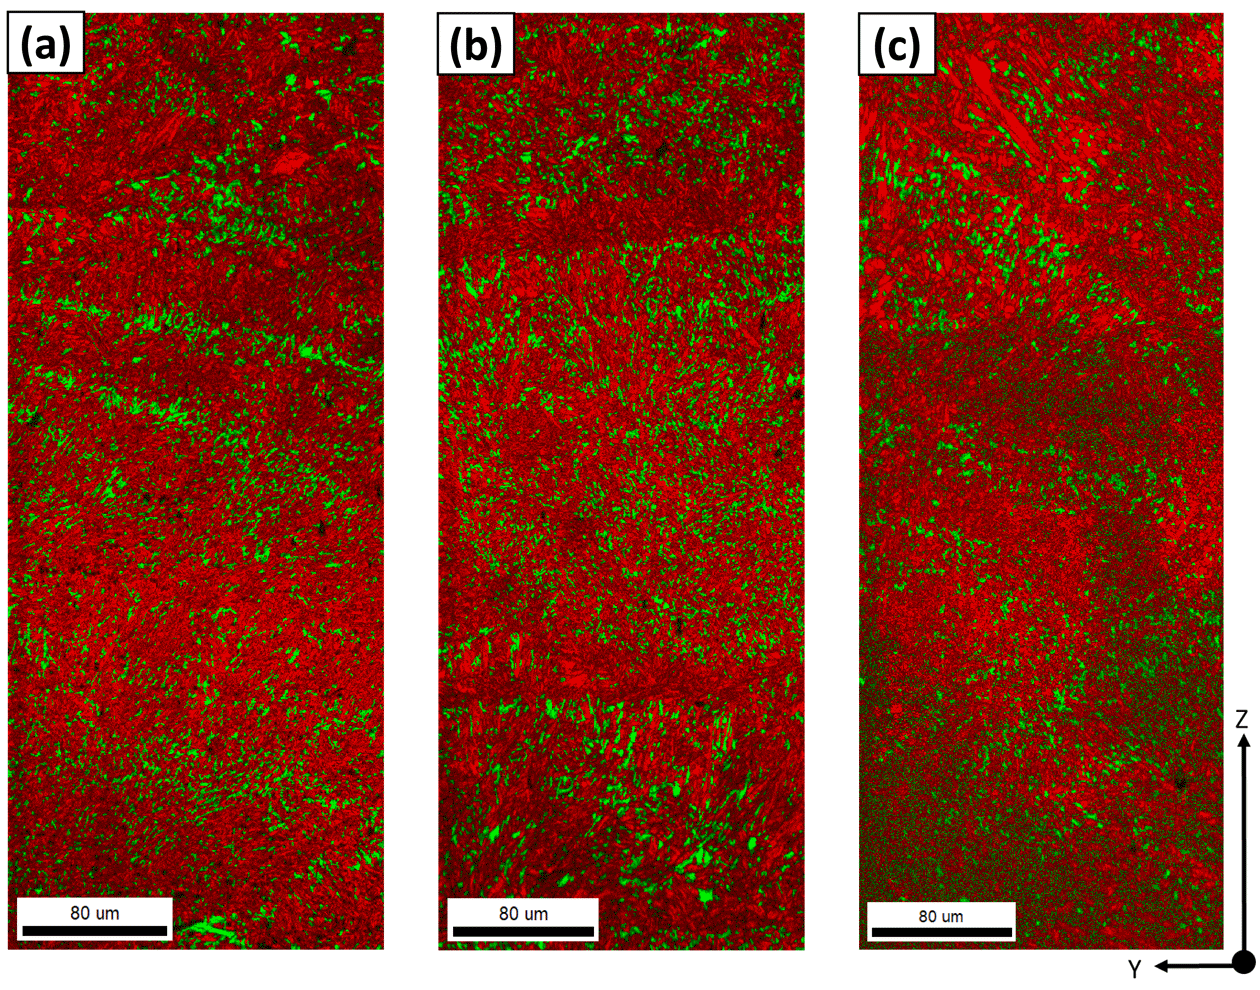
PDF The microstructure and mechanical characteristics of SUS630 specimens fabricated using the direct energy deposition (DED) process are investigated. In DED, several process parameters such as laser scan speed, chamber gas flow, powder carrier gas flow, and powder feed rate are kept fixed; the laser power is changed as 150 W, 180 W, and 210 W. As the laser power increases, the surface becomes smooth, the thickness uniformity improves, and the size and number of pores decreases. With the increase in laser power, the hardness deviation decreases and the average hardness increases. The microstructure of the material is columnar; pores are formed preferentially along the columnar interface. The lath-martensite phase governs the overall microstructure. The volumetric fraction of the retained austenite phase is measured to increase with the increase of laser input power.
-
Citations
Citations to this article as recorded by- Optimization of Additive Manufacturing of Precipitation Hardening Type STS630 by DED (Direct Energy Deposition) Process
Yongjae Kwon, SeongSeon Shin, SangEun Joo, JongHoon Lee, JunHo Hwang, HyunDeok Kim
Journal of Welding and Joining.2021; 39(6): 590. CrossRef - Effects of pre- and post-repair heat treatments on microstructure and tensile behaviors of 630 stainless steel repaired by metal additive manufacturing
Do Sik Shim, Hyub Lee, Yong Son, Wook Jin Oh
Journal of Materials Research and Technology.2021; 13: 980. CrossRef - Solution annealing and precipitation hardening effect on the mechanical properties of 630 stainless steel fabricated via laser melting deposition
Wook Jin Oh, Yong Son, Seung Yeong Cho, Seung Weon Yang, Gwang Yong Shin, Do Sik Shim
Materials Science and Engineering: A.2020; 794: 139999. CrossRef - Spheroidization of Pure-vanadium Powder using Radio Frequency Thermal Plasma Process
Nana Kwabena Adomako, Seungmin Yang, Min Gyu Lee, N. S. Reddy, Jeoung-Han Kim
Journal of Korean Powder Metallurgy Institute.2019; 26(4): 305. CrossRef - Joint Properties of Stainless Steel and Titanium Alloys Additive Manufactured on Medium Entropy Alloys
Chan Woong Park, Nana Kwabena Adomako, Min Gyu Lee, Jeoung Han Kim
Journal of Korean Powder Metallurgy Institute.2019; 26(4): 319. CrossRef
- Optimization of Additive Manufacturing of Precipitation Hardening Type STS630 by DED (Direct Energy Deposition) Process
TOP
 KPMI
KPMI


 First
First Prev
Prev


